Lesson Info
2. Lighting and Concept
Lessons
Introduction
00:59 2Lighting and Concept
02:07 3Cropping
02:38 4Bringing in the New Background
02:44 5Masking
32:02 6Creating Depth
07:27 7Painting Wet Rain on Costuming
28:45 8Creating Rain Drops
15:06Lesson Info
Lighting and Concept
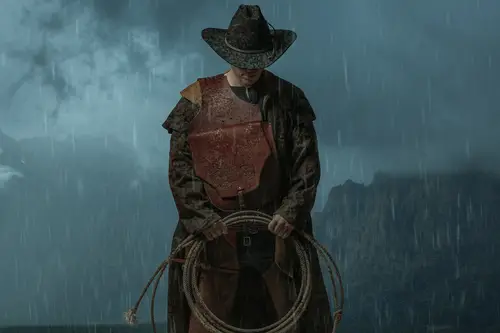
So I come from a family of ranchers and small farmers, and the concept for this shoot came from having the opportunity to photograph my dad in the studio. My dad has a very unique collection of clothing and costuming and styling, and after seeing the photos that I got of him, I was really inspired to try and make something again, but with the intention of turning them into composites. So I was in the studio and I photographed this with a beauty dish on a boom stand. So I just had my really old alien bees at the time and a beauty dish with a diffused sock on top of it. And, um, I just brought the boom stand out over in the middle of the site ball, and I made sure it was far enough away from the subject so that the lighting wasn't going to affect the background. I didn't want to pure white background and then for costuming. I basically borrowed a bunch of my dad's stuff. I borrowed his last few shops, jackets, hats, um, saddlebags, basically all the stuff that I had known him to have mos...
t of my life, and I put it on a model and we shot it in the studio and kind of just tried to see how it all come together. Uh, I did shoot everything tethered with my canon five D mark three, my 1 35 millimeter prime lens, uh, shot tethered to capture one on my computer. So I do this all the time. When I'm shooting in the studio, I make sure that I'm shooting tethered, that I can see every single shot that comes up and make sure that I'm not missing anything important. So this is the overview shot of the lighting set up for the entire space in the studio. This is the image that I shot straight at the camera so you can see the lighting coming down from the direction and because we're far enough away, the background isn't blown up here white. And I'm actually getting a little bit of reflection off the white ground to the last two on the bottom, which is filling in some of the shadows. And this is the final composite. And, uh, we're going to walk through this whole thing step by step. I'm going to show you how we took this image from being shot in the studio and make this awesome composite in post
Class Materials
Bonus Materials with Purchase
Ratings and Reviews
Steve Vick
Great hands-on course. I love Renee's straight forward approach. This is the tool, this is what we are going doing with it and here's how to use it. For me it is the fastest and most practical way to learn. No fluff, no long-winded stories... just doing! In some of the other courses I viewed, I find myself skipping ahead waiting for them to get to the point. But this course has a great pace. I will certainly look for more from this teacher. Thank you.
Lukas Ujma
Greater, nice work! Semply and clever.
a Creativelive Student
I've been compositing for a few years, but masking a subject always presents its challenges. Renée gave a series of tips that were very helpful, including information about how to use the "burn" tool to enhance a mask. That's something I'd never done before. Can't wait to try it! The part of the lesson that explained how to make the subject look as though his clothes had been in the rain was also an eye-opener. The method is simple, but the results are outstanding. I had tried making my subjects look as though they had been rained on, but it never looked real. Now I know how to fix that!
Student Work
Related Classes
Adobe Photoshop